Note:
This topic has been translated from a Chinese forum by GPT and might contain errors.
Original topic: 删除 .tiup 目录后,重新安装tiup,使用 tiup cluster list 无法查看原有集群,如何将集群添加到tiup管理
【TiDB Usage Environment】Production Environment
【TiDB Version】v6.5.0
【Encountered Problem: Phenomenon and Impact】The .tiup directory was cleaned up and deleted. After reinstalling the new version of tiup, tiup cluster list can no longer display the previously deployed clusters.
【Resource Configuration】
【Attachments: Screenshots/Logs/Monitoring】
All the metadata is stored here. If you delete it, it definitely won’t work. Refer to this link to restore it:
Thank you, I will give it a try.
Confirm the purpose of this recovery, which is to restore the metadata in .tiup, as it is the foundation for managing the cluster. With this metadata, the new tiup will continue to maintain the previous cluster.
Recovery Steps
- Manually write the final cluster topo file.
- Batch move the instance-level bin/{instance}-server files, explanation can be found in [2].
- Follow the tiup deployment steps to perform the deploy operation, explanation can be found in [3].
[2] Since the deployment uses the released tiup, it is necessary to overwrite the instance-level binary files. However, this does not affect the running services. During the replacement process, a Text file busy issue may occur, so you need to manually move all binary files to old or other names (mv tidb-server tidb-server_old). This step must be completed thoroughly to avoid issues during deployment. Otherwise, steps 2 and 3 need to be repeated.
[3] Since the current tiup does not have the cluster metadata, the deploy will not encounter directory port conflicts. The deploy will download the specified version of the binary files and overwrite the original cluster. (Since this is an unconventional deploy, overwriting is considered a normal operation, and upgrade will back up the bin directory.)
Precautions
- The version specified during deploy must be correct and the same version.
- All nodes’ binary files need to be moved.
- Ensure the completeness of the topology file, consistent with the final cluster nodes. Pay attention to the parameters such as deploy-dir/data_dir/port/status_port.
Manually write the final cluster topo file,
Need to batch move the instance-level bin/{instance}-server files,
Follow the tiup deployment steps to perform the deploy operation.
You can regularly back up the TiUP metadata
tiup cluster meta
Usage:
  meta [command]

Available Commands:
  backup      backup topology and other information of cluster
  restore     restore topology and other information of cluster

Flags:
  -h, --help   help for meta

Global Flags:
  -c, --concurrency int     max number of parallel tasks allowed (default 5)
      --format string       (EXPERIMENTAL) The format of output, available values are [default, json] (default "default")
      --ssh string          (EXPERIMENTAL) The executor type: 'builtin', 'system', 'none'.
      --ssh-timeout uint    Timeout in seconds to connect host via SSH, ignored for operations that don't need an SSH connection. (default 5)
      --wait-timeout uint   Timeout in seconds to wait for an operation to complete, ignored for operations that don't fit. (default 120)
  -y, --yes                 Skip all confirmations and assumes 'yes'

Use "meta help [command]" for more information about a command.
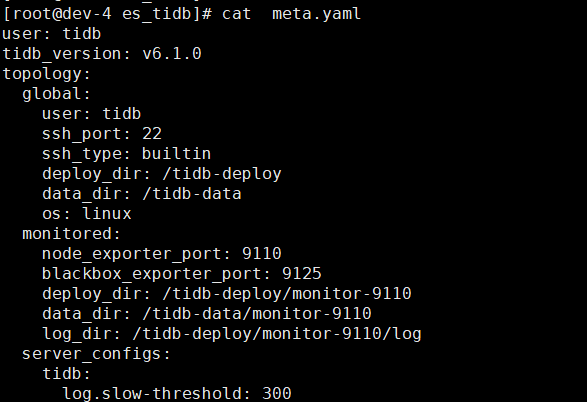
The final solution is to create the path /root/.tiup/storage/cluster/clusters/es_tidb based on your own cluster. Here, es_tidb is the name of the cluster. The meta.yaml and ssh directory should be stored below. The meta.yaml is the cluster topology, and the ssh directory needs to store the private key, ensuring that the TiDB user can SSH to other nodes from the control machine using this private key. The structure of the meta.yaml file is as follows.
This topic was automatically closed 60 days after the last reply. New replies are no longer allowed.
