Note:
This topic has been translated from a Chinese forum by GPT and might contain errors.Original topic: 使用TiUP部署 TiDB 集群,如何使用安全认证方式
[TiDB Usage Environment] Single machine with multiple instances simulating a production environment, the company does not provide the root password
[TiDB Version] v7.5.0
[Reproduction Path] Operations performed that led to the issue:
- Connected using ssh 192.168.36.61, the user on 192.168.36.61 is deployer, without sudo permissions and without the root password.
Following the documentation to deploy a TiDB cluster with TiUP on a single machine with multiple instances, at step 4: executing the deployment command
tiup cluster check ./topology.yaml --user root
did not use a secure authentication method. The documentation mentions two authentication methods but does not clarify how to generate them.
The documentation states that cluster deployment via TiUP can use either a key or an interactive password for secure authentication:
If using a key, you can specify the key path with -i or --identity_file. How is this key generated?
If using a password, you can enter the password interactively with -p. How is this SSH Password generated?
[Encountered Issue: Problem Phenomenon and Impact]
When executing the command, the log shows the following error. Based on personal guess, it roughly means that when connecting ssh: unable to authenticate, attempted methods [none publickey], no supported methods remain. Unable to authenticate 192.168.36.61.
2024-02-02T17:05:09.862+0800 INFO Execute command finished {“code”: 1, “error”: “failed to fetch cpu-arch or kernel-name: executor.ssh.execute_failed: Failed to execute command over SSH for ‘root@192.168.36.61:22’ {ssh_stderr: , ssh_stdout: , ssh_command: export LANG=C; PATH=$PATH:/bin:/sbin:/usr/bin:/usr/sbin uname -m}, cause: ssh: handshake failed: ssh: unable to authenticate, attempted methods [none publickey], no supported methods remain”, “errorVerbose”: “executor.ssh.execute_failed: Failed to execute command over SSH for ‘root@192.168.36.61:22’ {ssh_stderr: , ssh_stdout: , ssh_command: export LANG=C; PATH=$PATH:/bin:/sbin:/usr/bin:/usr/sbin uname -m}, cause: ssh: handshake failed: ssh: unable to authenticate, attempted methods [none publickey], no supported methods remain\n at github.com/pingcap/tiup/pkg/cluster/executor.(*EasySSHExecutor).Execute()\n\tgithub.com/pingcap/tiup/pkg/cluster/executor/ssh.go:174\n at github.com/pingcap/tiup/pkg/cluster/executor.(*CheckPointExecutor).Execute()\n\tgithub.com/pingcap/tiup/pkg/cluster/executor/checkpoint.go:86\n at github.com/pingcap/tiup/pkg/cluster/task.(*Shell).Execute()\n\tgithub.com/pingcap/tiup/pkg/cluster/task/shell.go:43\n at github.com/pingcap/tiup/pkg/cluster/task.(*Serial).Execute()\n\tgithub.com/pingcap/tiup/pkg/cluster/task/task.go:86\n at github.com/pingcap/tiup/pkg/cluster/task.(*StepDisplay).Execute()\n\tgithub.com/pingcap/tiup/pkg/cluster/task/step.go:111\n at github.com/pingcap/tiup/pkg/cluster/task.(*Parallel).Execute.func1()\n\tgithub.com/pingcap/tiup/pkg/cluster/task/task.go:144\n at runtime.goexit()\n\truntime/asm_amd64.s:1650\ngithub.com/pingcap/errors.AddStack\n\tgithub.com/pingcap/errors@v0.11.5-0.20201126102027-b0a155152ca3/errors.go:174\ngithub.com/pingcap/errors.Trace\n\tgithub.com/pingcap/errors@v0.11.5-0.20201126102027-b0a155152ca3/juju_adaptor.go:15\ngithub.com/pingcap/tiup/pkg/cluster/task.(*Shell).Execute\n\tgithub.com/pingcap/tiup/pkg/cluster/task/shell.go:50\ngithub.com/pingcap/tiup/pkg/cluster/task.(*Serial).Execute\n\tgithub.com/pingcap/tiup/pkg/cluster/task/task.go:86\ngithub.com/pingcap/tiup/pkg/cluster/task.(*StepDisplay).Execute\n\tgithub.com/pingcap/tiup/pkg/cluster/task/step.go:111\ngithub.com/pingcap/tiup/pkg/cluster/task.(*Parallel).Execute.func1\n\tgithub.com/pingcap/tiup/pkg/cluster/task/task.go:144\nruntime.goexit\n\truntime/asm_amd64.s:1650\nfailed to fetch cpu-arch or kernel-name”}
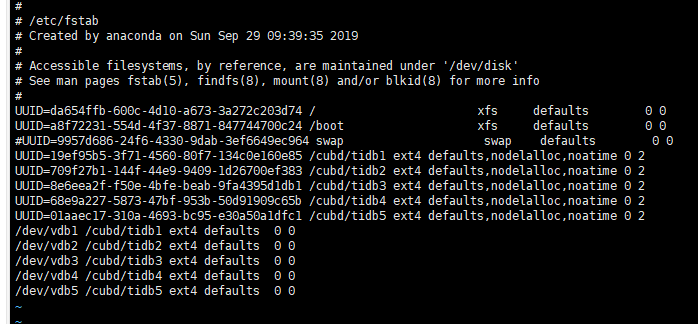
After specifying the root account and password with -p, using the command tiup cluster check ./topology.yaml --apply --user k8soperator -p to execute the check, it was found that the mounted directory does not support the nodelalloc parameter
does not have ‘nodelalloc’ option set, auto fixing not supported. How can this be resolved?
[deployer@k8s-node2 tidb]$ tiup cluster check ./topology.yaml --apply --user k8soperator -p
tiup is checking updates for component cluster …
Starting component cluster: /home/deployer/.tiup/components/cluster/v1.14.1/tiup-cluster check ./topology.yaml --apply --user k8soperator -p
Input SSH password:
-
Detect CPU Arch Name
- Detecting node 192.168.36.61 Arch info … Done
-
Detect CPU OS Name
- Detecting node 192.168.36.61 OS info … Done
-
Download necessary tools
- Downloading check tools for linux/amd64 … Done
-
Collect basic system information
-
Collect basic system information
- Getting system info of 192.168.36.61:22 … Done
-
Check time zone
- Checking node 192.168.36.61 … Done
-
Check system requirements
-
Check system requirements
-
Check system requirements
-
Check system requirements
- Checking node 192.168.36.61 … Done
- Checking node 192.168.36.61 … Done
- Checking node 192.168.36.61 … Done
- Checking node 192.168.36.61 … Done
- Checking node 192.168.36.61 … Done
- Checking node 192.168.36.61 … Done
- Checking node 192.168.36.61 … Done
- Checking node 192.168.36.61 … Done
- Checking node 192.168.36.61 … Done
- Checking node 192.168.36.61 … Done
- Checking node 192.168.36.61 … Done
- Checking node 192.168.36.61 … Done
- Checking node 192.168.36.61 … Done
-
Cleanup check files
- Cleanup check files on 192.168.36.61:22 … Done
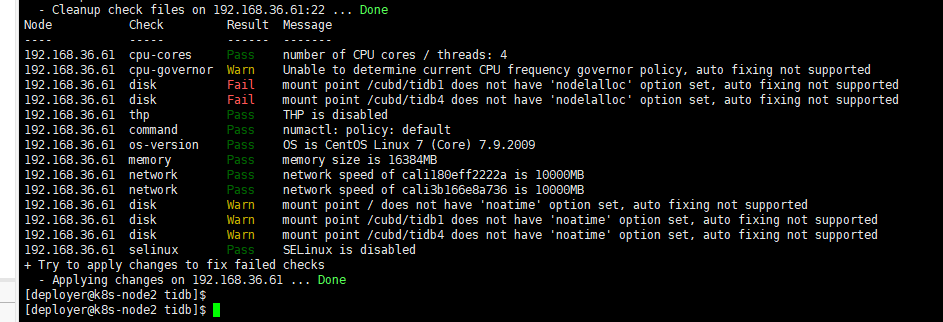
Node Check Result Message
- Cleanup check files on 192.168.36.61:22 … Done
192.168.36.61 cpu-cores Pass number of CPU cores / threads: 4
192.168.36.61 cpu-governor Warn Unable to determine current CPU frequency governor policy, auto fixing not supported
192.168.36.61 disk Fail mount point /cubd/tidb1 does not have ‘nodelalloc’ option set, auto fixing not supported
192.168.36.61 disk Fail mount point /cubd/tidb4 does not have ‘nodelalloc’ option set, auto fixing not supported
192.168.36.61 thp Pass THP is disabled
192.168.36.61 command Pass numactl: policy: default
192.168.36.61 os-version Pass OS is CentOS Linux 7 (Core) 7.9.2009
192.168.36.61 memory Pass memory size is 16384MB
192.168.36.61 network Pass network speed of cali180eff2222a is 10000MB
192.168.36.61 network Pass network speed of cali3b166e8a736 is 10000MB
192.168.36.61 disk Warn mount point / does not have ‘noatime’ option set, auto fixing not supported
192.168.36.61 disk Warn mount point /cubd/tidb1 does not have ‘noatime’ option set, auto fixing not supported
192.168.36.61 disk Warn mount point /cubd/tidb4 does not have ‘noatime’ option set, auto fixing not supported
192.168.36.61 selinux Pass SELinux is disabled
- Try to apply changes to fix failed checks
- Applying changes on 192.168.36.61 … Done
- Applying changes on 192.168.36.61 … Done
[Resource Configuration] Enter TiDB Dashboard - Cluster Info - Hosts and screenshot this page
[Attachments: Screenshots/Logs/Monitoring]