Note:
This topic has been translated from a Chinese forum by GPT and might contain errors.Original topic: k8s Tidb实践-部署篇
1 Background
With the full maturity of Kubernetes (K8s), more and more organizations are starting to build their infrastructure layer on a large scale based on K8s. However, considering the core position of databases in the architecture and the shortcomings of K8s in stateful application orchestration, many organizations still believe that running core databases on K8s carries high risks. In fact, running TiDB on K8s not only unifies the enterprise technology stack and reduces maintenance costs but also brings higher availability and security. I am willing to be the first to take the plunge. I will gradually proceed with K8s TiDB deployment, functional testing, performance testing, etc. Today is the first article - deployment.
2 TiDB Architecture
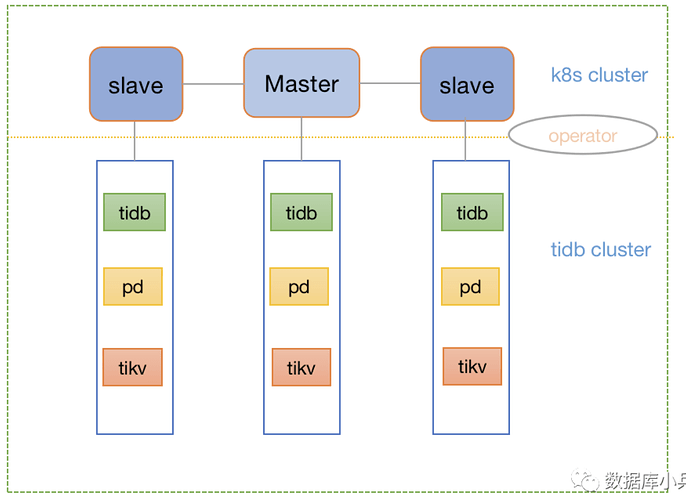
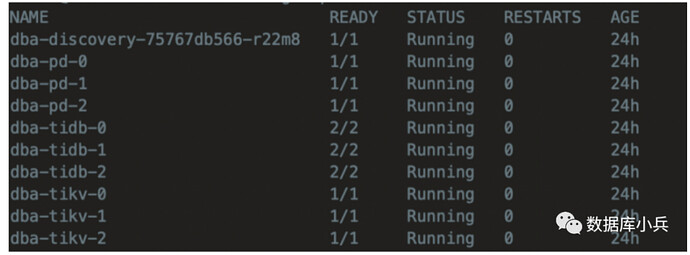
Simulate TiDB/PD/TiKV components with 3 nodes each. The K8s deployment is a 1 master 2 slave cluster. The final implementation is that each component replica of the TiDB cluster will be evenly distributed across the 3 K8s nodes, ensuring no node has multiple replicas of the same component. This relies on the automatic scheduling capabilities of K8s and the TiDB operator.
3 Component Configuration Details
Kubernetes Deployment
You can refer to Centos7安装k8s集群_centos 7 安装 no match for argument: iproute-tc-CSDN博客. There are many resources online, so I won’t go into detail here.
3.1 Configure Storage Class
The PD, TiKV, monitoring components, as well as TiDB Binlog and backup tools in the TiDB cluster, all need to use storage that persists data. Data persistence on Kubernetes requires using PersistentVolume (PV). Kubernetes provides various storage types, mainly divided into two categories: network storage and local storage. Here, I use local storage.
Local PV Configuration:
Sharing a disk filesystem by multiple filesystem PVs
Assume /mnt/disks is the provisioner discovery directory.
1. Format and mount
$ sudo mkfs.ext4 /dev/path/to/disk
$ DISK_UUID=$(blkid -s UUID -o value /dev/path/to/disk)
$ sudo mkdir /mnt/$DISK_UUID
$ sudo mount -t ext4 /dev/path/to/disk /mnt/$DISK_UUID
2. Persistent mount entry into /etc/fstab
$ echo UUID=`sudo blkid -s UUID -o value /dev/path/to/disk` /mnt/$DISK_UUID ext4 defaults 0 2 | sudo tee -a /etc/fstab
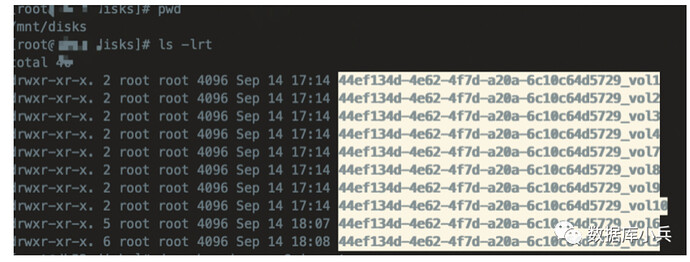
3. Create multiple directories and bind mount them into the discovery directory
for i in $(seq 1 10); do
  sudo mkdir -p /mnt/${DISK_UUID}/vol${i} /mnt/disks/${DISK_UUID}_vol${i}
  sudo mount --bind /mnt/${DISK_UUID}/vol${i} /mnt/disks/${DISK_UUID}_vol${i}
done
4. Persistent bind mount entries into /etc/fstab
for i in $(seq 1 10); do
  echo /mnt/${DISK_UUID}/vol${i} /mnt/disks/${DISK_UUID}_vol${i} none bind 0 0 | sudo tee -a /etc/fstab
done
Deploy local-volume-provisioner
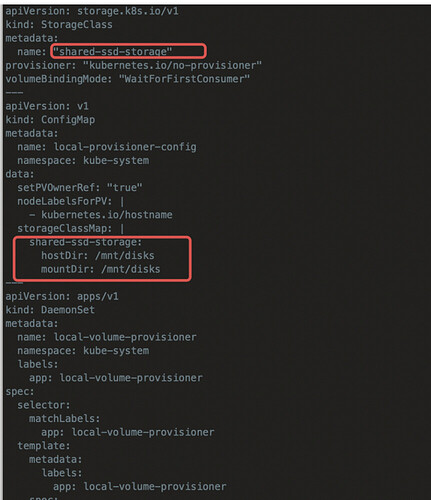
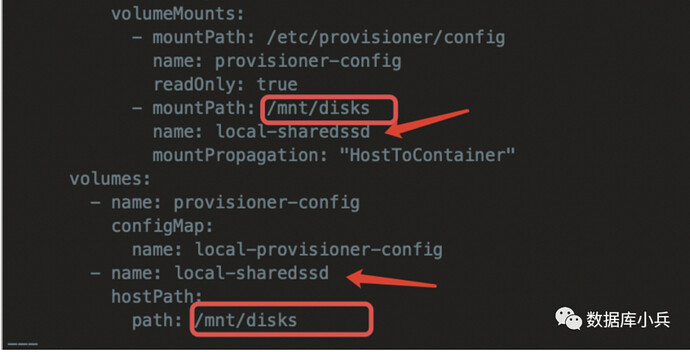
If you use a different path for the discovery directory than in the previous step, you need to modify the ConfigMap and DaemonSet definitions.
Modify the
volumes and volumeMounts fields in the DaemonSet definition to ensure the discovery directory can be mounted to the corresponding directory in the Pod:Deploy the local-volume-provisioner program
kubectl apply -f local-volume-provisioner.yaml
kubectl get po -n kube-system -l app=local-volume-provisioner && \
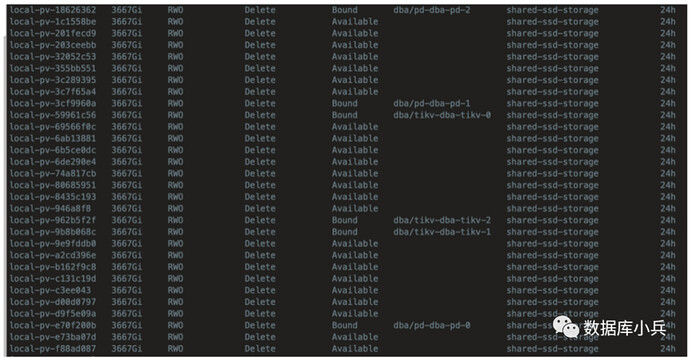
kubectl get pv | grep -e shared-ssd-storage
You will see a total of 30 PVs output, 10 per node.
03 Configure TiDB Operator
You can install it via Helm as introduced on the official website.
4 Configure TiDB Cluster
Here is the tidb_cluster.yaml configuration file. Each component of TiDB/PD/TiKV can specify CPU/memory and other hardware resource isolation in the configuration file, similar to cgroup. Other database parameters can also be customized in the config.
apiVersion: pingcap.com/v1alpha1
kind: TidbCluster
metadata:
name: dba
namespace: dba
spec:
# ** Basic Configuration **
# # TiDB cluster version
version: "v6.1.0"
# Time zone of TiDB cluster Pods
timezone: UTC
configUpdateStrategy: RollingUpdate
hostNetwork: false
imagePullPolicy: IfNotPresent
enableDynamicConfiguration: true
pd:
baseImage: pingcap/pd
replicas: 3
requests:
cpu: "50m"
memory: 50Mi
storage: 50Mi
limits:
cpu: "6000m"
memory: 20Gi
config: |
lease = 3
enable-prevote = true
storageClassName: "shared-ssd-storage"
mountClusterClientSecret: true
tidb:
baseImage: pingcap/tidb
config: |
split-table = true
oom-action = "log"
replicas: 3
requests:
cpu: "50m"
memory: 50Mi
storage: 10Gi
limits:
cpu: "8000m"
memory: 40Gi
storageClassName: "shared-ssd-storage"
service:
type: NodePort
mysqlNodePort: 30002
statusNodePort: 30080
tikv:
baseImage: pingcap/tikv
config: |
[storage]
[storage.block-cache]
capacity = "32GB"
replicas: 3
requests:
cpu: "50m"
memory: 50Mi
storage: 100Gi
limits:
cpu: "12000m"
memory: 40Gi
storageClassName: "shared-ssd-storage"
mountClusterClientSecret: true
enablePVReclaim: false
pvReclaimPolicy: Delete
tlsCluster: {}
Key Parameter Explanation:
apiVersion: Specifies the API version. This value must be in kubectl apiversion.
kind: Specifies the role/type of the resource to be created, such as Pod/Deployment/Job/Service, etc.
metadata: Metadata/attributes of the resource, such as name, namespace, labels, etc.
spec: Specifies the content of the resource, such as container, storage, volume, and other parameters required by Kubernetes.
replicas: Specifies the number of replicas.
requests: Represents the minimum resource limits requested by the container at startup. The allocated resources must meet this requirement, such as CPU, memory. Note that the unit of CPU measurement is called millicores (m). The total CPU quantity of a node is obtained by multiplying the number of CPU cores by 1000. For example, if a node has two cores, the total CPU quantity of the node is 2000m.
limits: The maximum available value of the component’s resource limits.
storageClassName: Storage class, which must correspond to the class created in advance.
tidb:
   service

        type: NodePort
Service can be configured with different types according to the scenario, such as ClusterIP, NodePort, LoadBalancer, etc., and different types can have different access methods.
ClusterIP: Exposes the service through the internal IP of the cluster. When choosing this type of service, it can only be accessed within the cluster.
NodePort: Exposes the service through the node’s IP and static port. By requesting NodeIP + NodePort, a NodePort service can be accessed from outside the cluster.
If running in an environment with a LoadBalancer, such as GCP/AWS platform, it is recommended to use the LoadBalancer feature of the cloud platform.
5 Deploy TiDB Cluster
Create Namespace:
kubectl create namespace dba
Deploy TiDB Cluster:
kubectl apply -f tidb_cluster.yaml
6 Initialize TiDB Cluster
Mainly used to initialize account and password settings, and batch execute SQL statements to initialize the database.
tidb-initializer.yaml
---
apiVersion: pingcap.com/v1alpha1
kind: TidbInitializer
metadata:
name: demo-init
namespace: demo
spec:
image: tnir/mysqlclient
# imagePullPolicy: IfNotPresent
cluster:
namespace: demo
name: demo
initSql: |-
create database app;
# initSqlConfigMap: tidb-initsql
passwordSecret: tidb-secret
# permitHost: 172.6.5.8
# resources:
# limits:
# cpu: 1000m
# memory: 500Mi
# requests:
# cpu: 100m
# memory: 50Mi
# timezone: "Asia/Shanghai"
Execute Initialization:
kubectl apply -f ${cluster_name}/tidb-initializer.yaml --namespace=${namespace}
7 Access TiDB Cluster
kubectl get svc -n dba
You can connect and access the cluster internally via the private network IP:
mysql -uroot -P4000 -h 10.111.86.242 -pxxx
External access to the cluster is as follows:
mysql -uroot -P30002 -h machine real IP -pxxx
